This how-to article does not cover how to set up Azure AD as an IdP. We assume you already have Azure AD setup and working with a table of users.
Create a new Enterprise Application in Azure
-
From the Azure Portal go to Azure Active Directory > Enterprise Applications
-
Click New Application
-
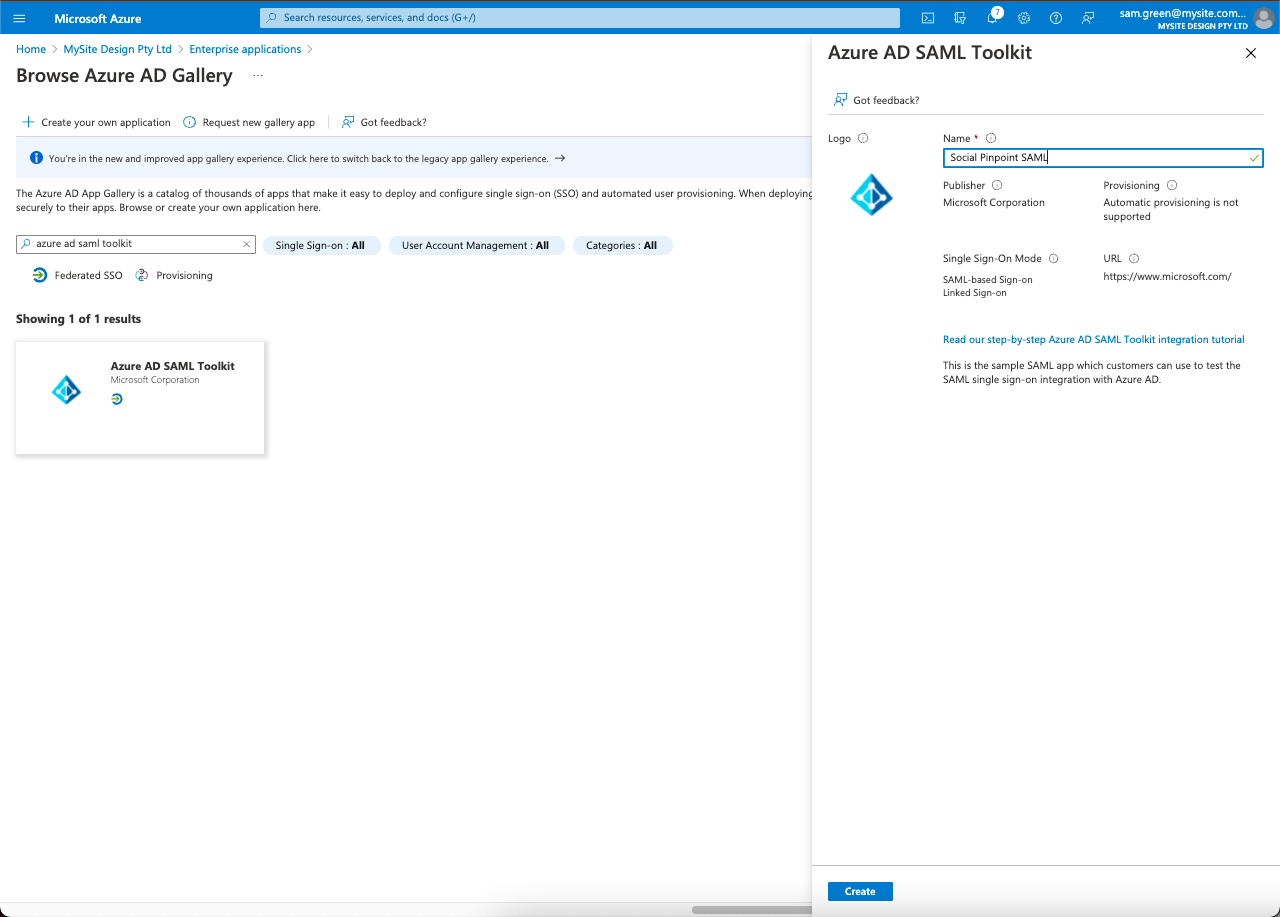
Search for Azure AD SAML Toolkit and select the option from the list
-
Name your new application (for example Social Pinpoint SAML)\
-
Click Create
From the Azure Portal go to Azure Active Directory > Enterprise Applications
Click New Application
Search for Azure AD SAML Toolkit and select the option from the list
Name your new application (for example Social Pinpoint SAML)\
Click Create

Create a new Identity Provider in Social Pinpoint (new tab)
-
Navigate to Manage Account (/admin/manage)
-
Click the New Identity Provider (IdP) button in the top-right
-
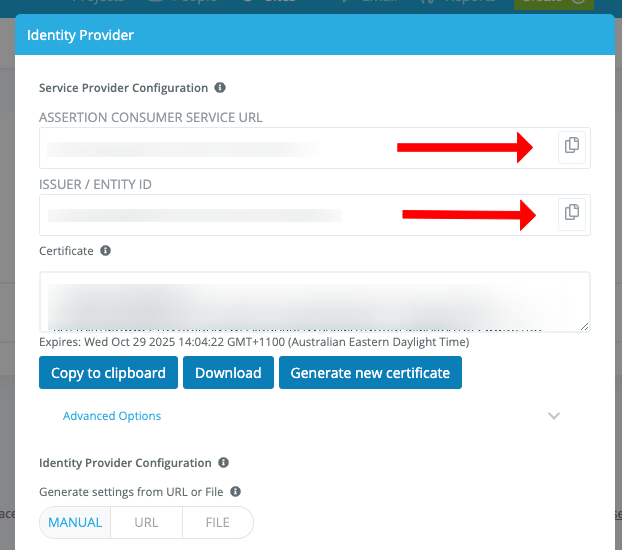
Copy the values for ASSERTION CONSUMER SERVICE URL and ISSUER / ENTITY ID and save these for the next step
-
Leave this window open for the moment
Navigate to Manage Account (/admin/manage)
Click the New Identity Provider (IdP) button in the top-right
Copy the values for ASSERTION CONSUMER SERVICE URL and ISSUER / ENTITY ID and save these for the next step
Leave this window open for the moment

Configure SAML Integration (back in Azure)
-
Navigate to the newly created Enterprise Application (you may need to search for it)
-
Add the users you wish to have access to Social Pinpoint
-
Click Single sign-on in the sidebar
-
Select SAML
-
Click the edit button for Basic SAML Configuration
-
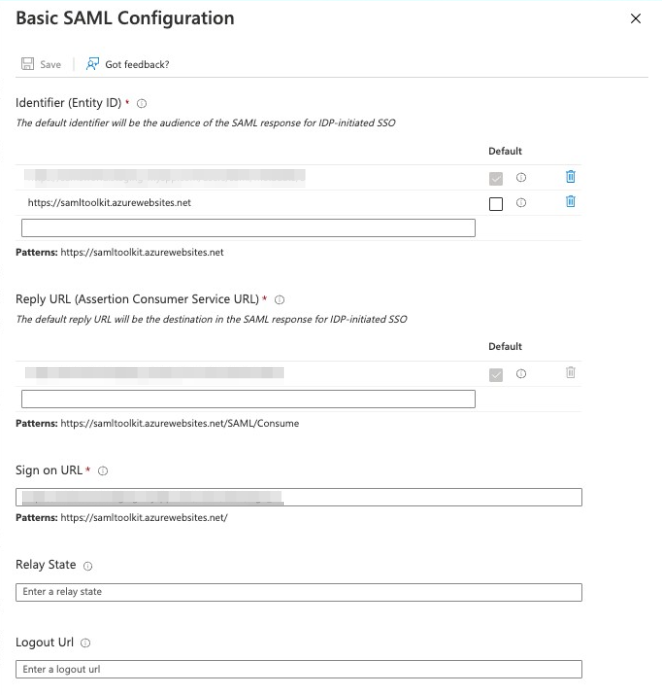
Enter the value you copied for ISSUER / ENTITY ID into the Identifier (Entity ID) field
-
Enter the value you copied for ASSERTION CONSUMER SERVICE URL into the Reply URL (Assertion Consumer Service URL) field
-
Set these values as the default using the provided checkboxes
-
Enter https://<socialpinpoint-domain>/users/saml/sign_in into the Sign on URL field. eg. demo.mysocialpinpoint.com/users/saml/sign_in
-
Click Save
Navigate to the newly created Enterprise Application (you may need to search for it)
Add the users you wish to have access to Social Pinpoint
Click Single sign-on in the sidebar
Select SAML
Click the edit button for Basic SAML Configuration
Enter the value you copied for ISSUER / ENTITY ID into the Identifier (Entity ID) field
Enter the value you copied for ASSERTION CONSUMER SERVICE URL into the Reply URL (Assertion Consumer Service URL) field
Set these values as the default using the provided checkboxes
Enter https://<socialpinpoint-domain>/users/saml/sign_in into the Sign on URL field. eg. demo.mysocialpinpoint.com/users/saml/sign_in
Click Save

Connect Social Pinpoint and Azure
-
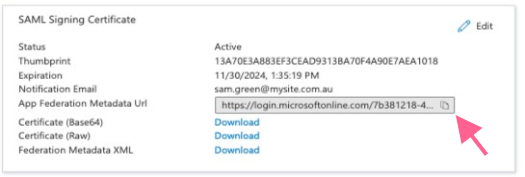
Copy the url under SAML Signing Certificate > App Federation Metadata Url
Copy the url under SAML Signing Certificate > App Federation Metadata Url

2. Paste this into the IDP Settings in Social Pinpoint under Identity Provider Configuration > Generate settings from URL or File and click URL

3. Click Generate settings
Configure SAML Attributes
-
In Azure, edit Attributes and Claims
-
Under Additional Claims find or add at least the values for email and first name (these may be named differently for you, but in our example they are userprincipalname and givenname)
-
Copy the Claim Name for these two values eg. http://schemas.xmlsoap.org/ws/2005/05/identity/claims/name and http://schemas.xmlsoap.org/ws/2005/05/identity/claims/givenname
-
Navigate to the SAML Attributes section of IDP Setting in Social Pinpoint
-
Copy the appropriate values into the inputs in Social Pinpoint
In Azure, edit Attributes and Claims
Under Additional Claims find or add at least the values for email and first name (these may be named differently for you, but in our example they are userprincipalname and givenname)
Copy the Claim Name for these two values eg. http://schemas.xmlsoap.org/ws/2005/05/identity/claims/name and http://schemas.xmlsoap.org/ws/2005/05/identity/claims/givenname
Navigate to the SAML Attributes section of IDP Setting in Social Pinpoint
Copy the appropriate values into the inputs in Social Pinpoint

Note: these values may not work for you, please check what values you use for email and first name
Optional - Set up User Provisioning
If you would like to have users that signed in via SAML SSO automatically be added to Social Pinpoint you can turn on User Provisioning and set a default role
Enable the Identity Provider
Once you are happy with your settings you may enable your Identity Provider inside of Social Pinpoint.
Once enabled the a Single Sign-On button should appear on the sigh-in screen
Once you have assigned your users to this app then they will be able to sign in to Social Pinpoint with one-click
.png)
